Assistants
When you add Assistants to your document, they’ll check your designs against a set of rules and let you know if they spot issues or inconsistencies. In the Assistants results window, you can filter through issues, quickly find the layer they relate to, and fix them.
Installing Assistants
You can add multiple Assistants to any document. You might have one that covers your company’s design system, another for accessibility and another for document organization, for example.
You’ll need to add Assistants on a per-document basis, but they will stay attached to that document when you share it with others. If someone doesn’t have the Assistants your document uses, they’ll be prompted to install them.
When you add an Assistant to a document, it will be available to use in any other document you create in the future, you’ll just need to enable it first.
To get started, you’ll need to add some Assistants, and there are a few different ways to do that:
Adding an Assistant from the Directory
On the Assistants Directory, you’ll find any Assistants that developers have decided to share publicly. You can click on any Assistant in the directory to view its full details, and choose Add to Sketch to open up the Mac app and add it.
You can open the Assistants Directory directly from the Mac app by choosing File > Assistants > Find Assistants….
Adding an Assistant from a Browser Link
Assistants developers can create a link to add an Assistant directly from the browser. When you click on one of these links, it will open the Mac app and display an alert asking if you’d like to download and install the Assistant ![]() . When you see this alert, choose Install.
. When you see this alert, choose Install.
Adding an Assistant from a URL or File
Open a document in the Mac app that you want to add Assistants to, then click on the Assistants ![]() toolbar item to open the results window.
toolbar item to open the results window.
In the Assistants results window, click on ![]() in the top-right corner and choose Manage Assistants…. If you have previously added Assistants to other documents you’ll see those listed in the Manage Assistants sheet. Underneath that list, click the smaller
in the top-right corner and choose Manage Assistants…. If you have previously added Assistants to other documents you’ll see those listed in the Manage Assistants sheet. Underneath that list, click the smaller ![]() and choose either Add from URL… or Add from File….
and choose either Add from URL… or Add from File….
Add from URL… will open up a dialog to enter a URL that leads directly to an Assistants file. Copy and paste in the URL and choose Install.
Add from Archive… will open up a file browser so you can choose an Assistant you’ve saved locally on your Mac. Assistants are stored as archive files, so their file extension will always be .tgz.
Installing Missing Assistants
If you open a document that contains Assistants you haven’t already installed, you’ll see a ! next to the Assistants toolbar icon ![]() . When you open the Assistants results window, any missing Assistants will show a thumbnail with a
. When you open the Assistants results window, any missing Assistants will show a thumbnail with a ?. Click on that thumbnail, then choose Install to install the missing Assistant.
You can also click on the banner that appears in the all results view to install all missing Assistants.
Uninstalling an Assistant
To uninstall an Assistant, open the Assistants results window, click on ![]() and choose Manage Assistants…. Control-click on the Assistant’s name to open its contextual menu and choose Uninstall.
and choose Manage Assistants…. Control-click on the Assistant’s name to open its contextual menu and choose Uninstall.
Enabling Assistants in your Document
When you add an Assistant ![]() to a document it will be enabled by default. From the Manage Assistants sheet, you can disable Assistants for your document and enable any previously installed Assistants.
to a document it will be enabled by default. From the Manage Assistants sheet, you can disable Assistants for your document and enable any previously installed Assistants.
To do this, click on the Assistants ![]() menu bar item, then click on
menu bar item, then click on ![]() in the top-right and choose Manage Assistants…. From here, you can either use the checkboxes next to each Assistant’s name to enable or disable them for your document, or Control-click and choose Enable for Document or Disable for Document from the contextual menu.
in the top-right and choose Manage Assistants…. From here, you can either use the checkboxes next to each Assistant’s name to enable or disable them for your document, or Control-click and choose Enable for Document or Disable for Document from the contextual menu.
You can enable Assistants via their checkbox item or via their contextual menu
Working with Assistants
When you’ve installed and enabled Assistants in your document, they’ll check it for any issues or inconsistencies against the set of the rules they’ve been built to follow. By default, Assistants run automatically and should update their results after you make changes in your document.
To stop Assistants from automatically checking your document choose File > Assistants > Check Document Automatically from the menu bar to toggle this option off. With automatic checking switched off, you’ll need to choose File > Assistants > Check Document Now (or press ⌘⇧B) any time you want Assistants to update their results.
Viewing Results
When the Assistants you’ve added to your document check it and spot issues, they’ll display a notification badge next to the Assistants toolbar item ![]() . Clicking on the toolbar item will bring up the Assistants results window and show you a list of every issue in your document. When you fix an issue, Assistants will check your document again and you should see it disappear from the results list.
. Clicking on the toolbar item will bring up the Assistants results window and show you a list of every issue in your document. When you fix an issue, Assistants will check your document again and you should see it disappear from the results list.
You can also show and hide the Assistants results window at any time by choosing View > Show/Hide Assistants or press ⌘⌥3.
Here’s what you’ll see in the results window:
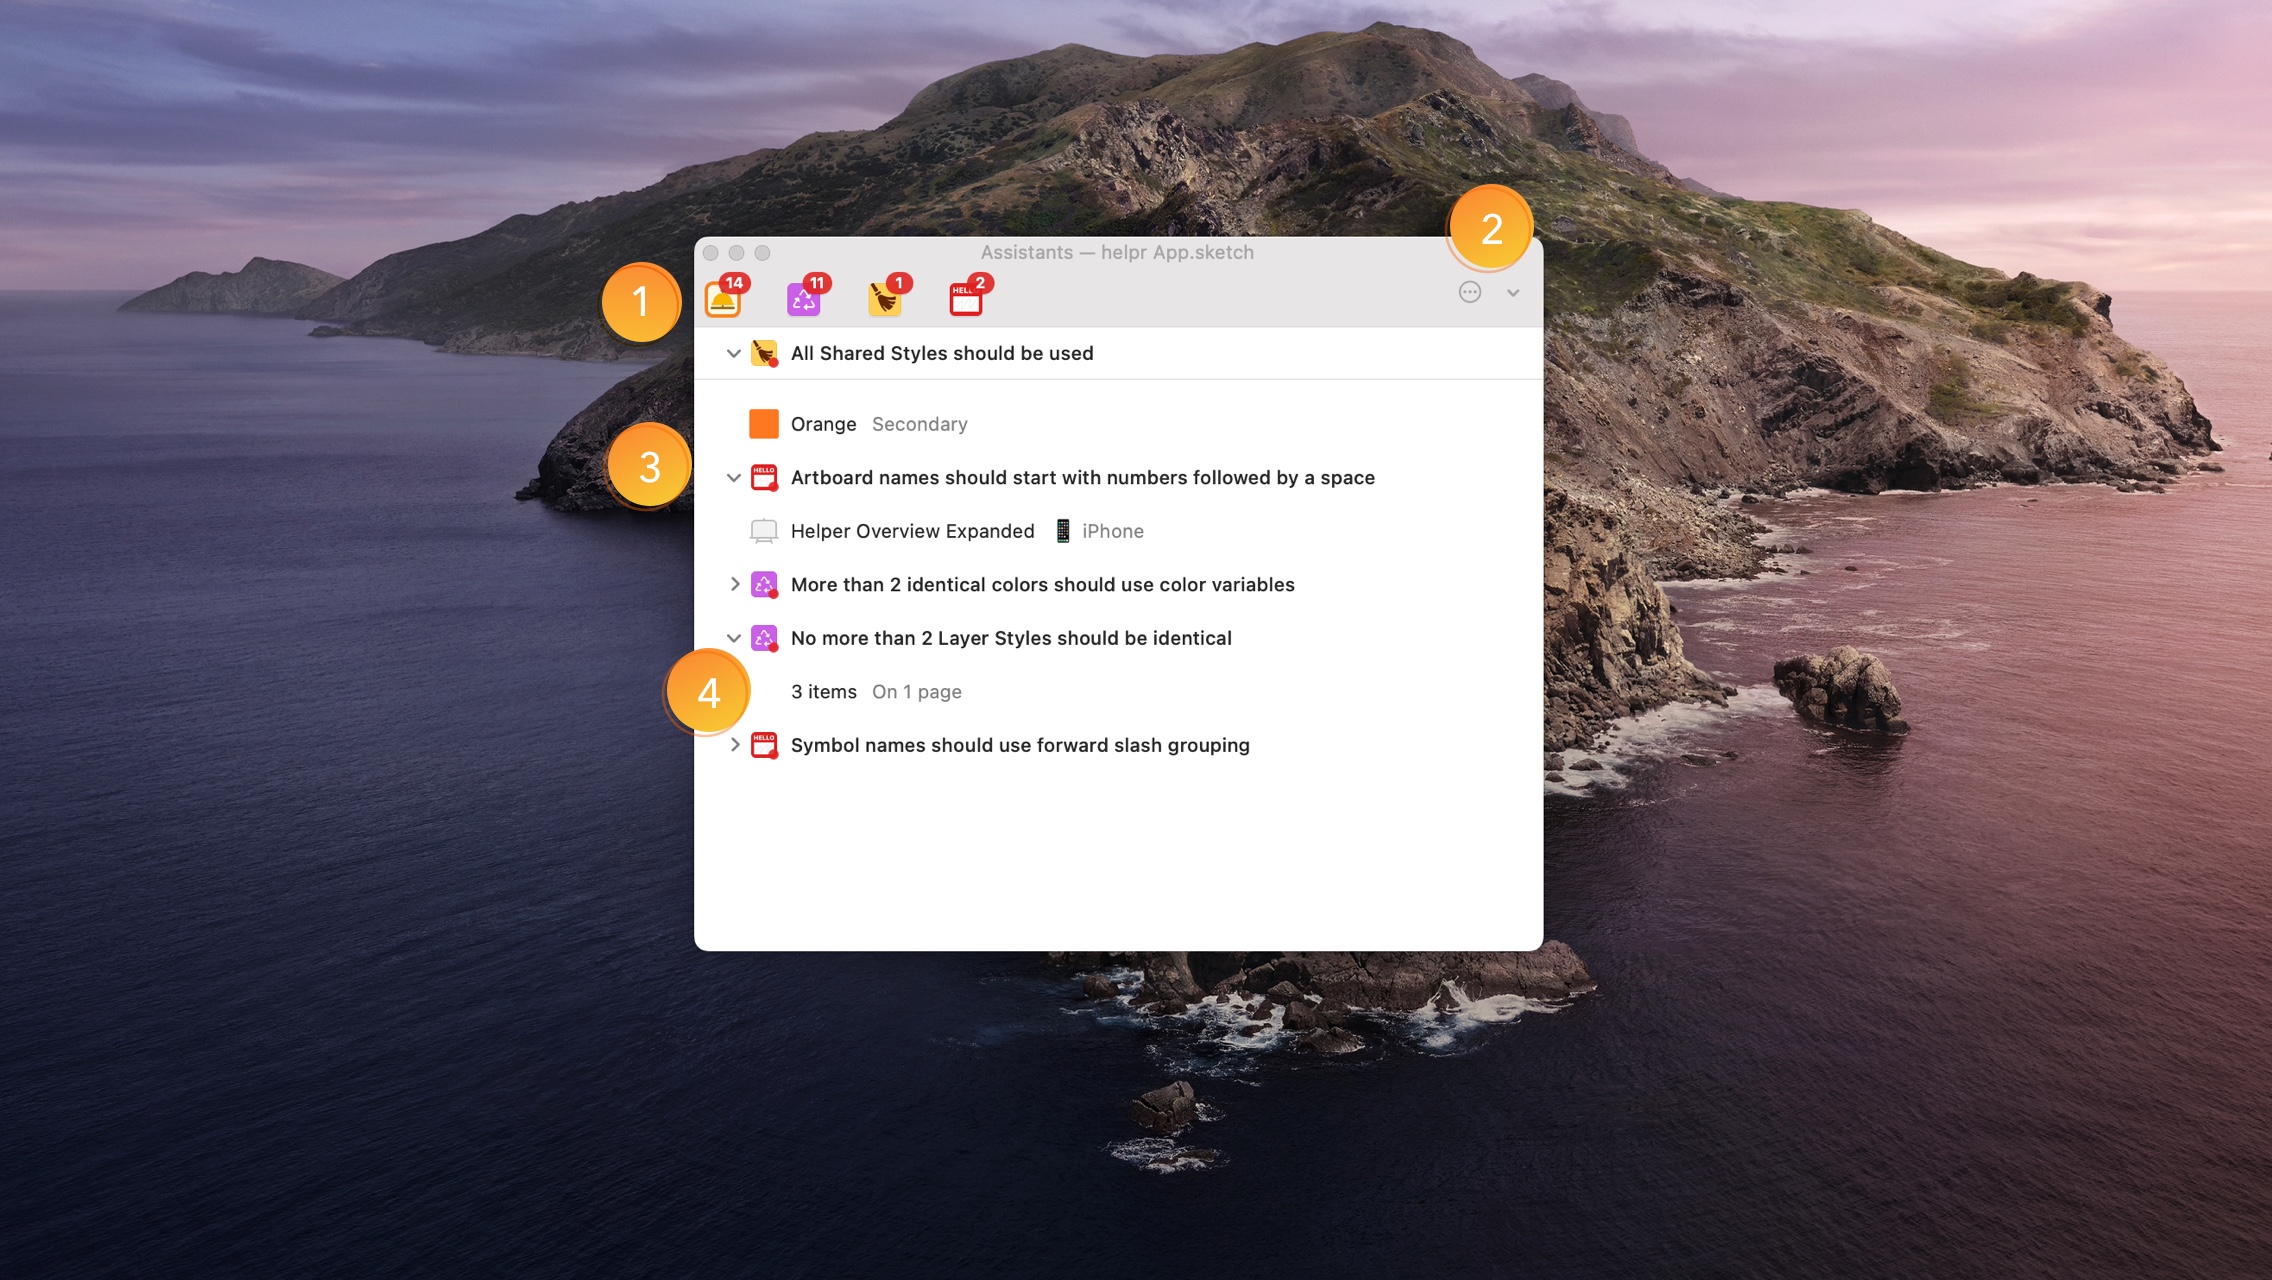
- Each Assistant has its own thumbnail and a notification badge with the current number of issues it has found. Clicking on these thumbnails filters the results list to show only issues from the Assistant you’ve selected. Clicking the leftmost thumbnail will reset the view and show you issues from all Assistants.
- The circle icon
 gives you access to the Manage Assistants sheet, settings to show or hide ignored rules, and a link to open the Assistants directory (coming soon).
 - Each issue in the results list is collapsible (handy if you have a lot to look through!) and hovering over it will reveal a
?icon. Clicking on this will open a browser window with documentation for that specific rule from the Assistant’s developer. - Each issue lists the layers that relate to it. When you hover over a layer, you’ll see a
→icon. Clicking on this will take you directly to that layer on your Canvas. You can also Control-click on any layer in the list and choose Reveal to find it on the Canvas.
Ignoring Issues
Sometimes, the rule an Assistant is checking against might not be helpful. Or you might be working on rough ideas and want to silence some unnecessary Assistants notifications. In these cases, you can ignore issues on specific layers — or even your whole document.
To ignore an issue for a specific layer, open the Assistants results window by clicking on ![]() , then Control-click on the layer listed under the issue you want to ignore. In the contextual menu that appears, choose Ignore.
, then Control-click on the layer listed under the issue you want to ignore. In the contextual menu that appears, choose Ignore.
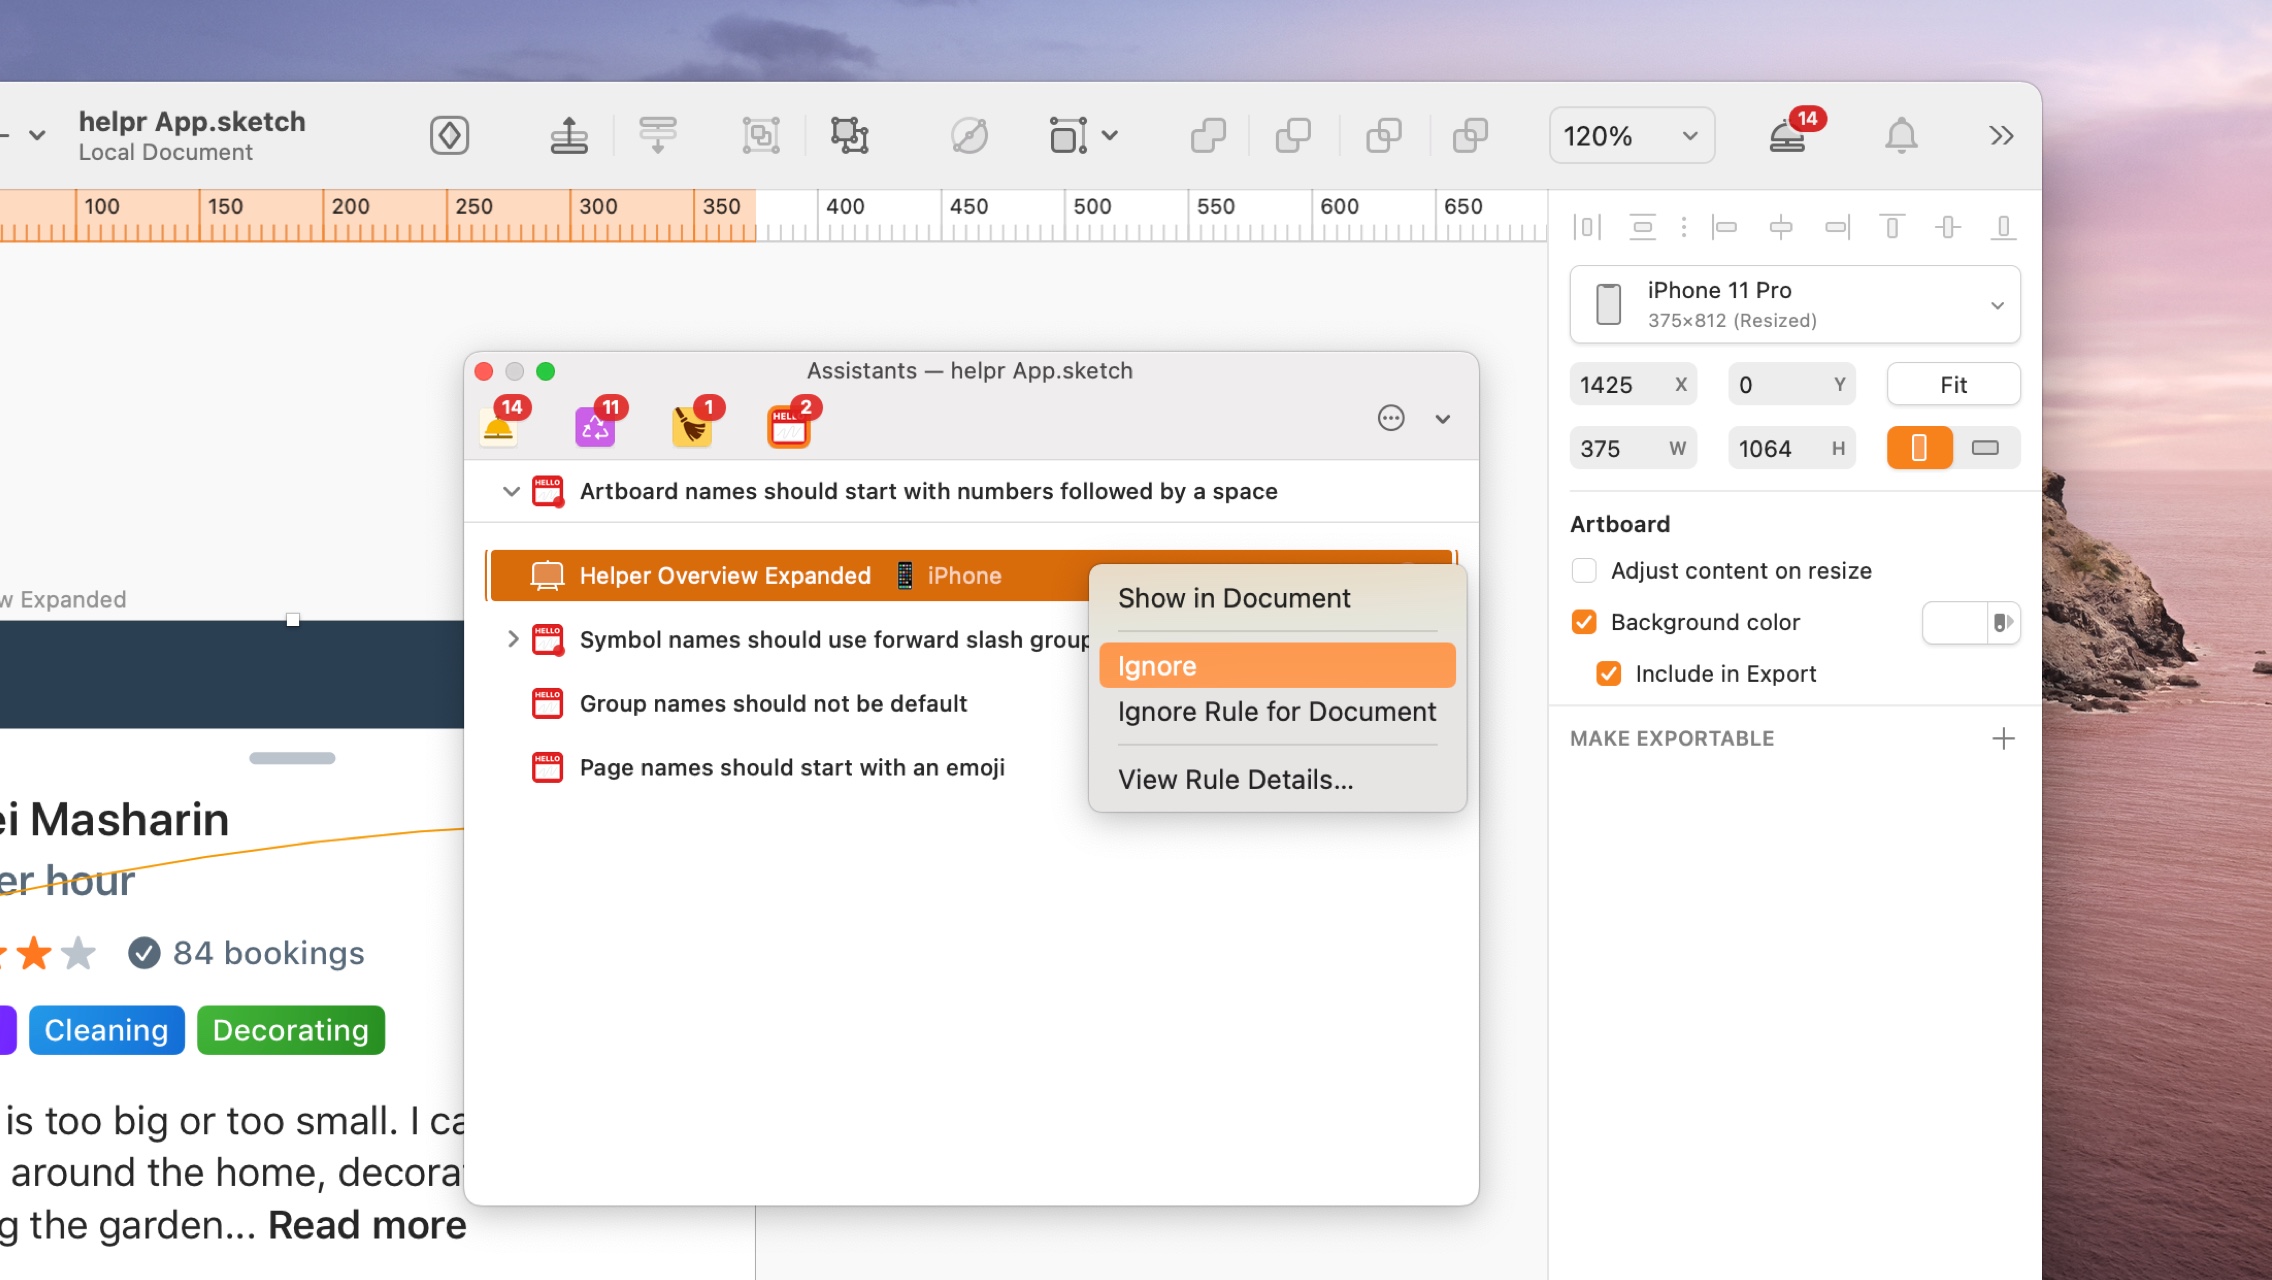
You can ignore rules for specific layers or your entire document
To ignore an issue for an entire document, Control-click on the issue’s description in the results window and choose Ignore Rule for Document.
When you ignore an issue, either for a specific layer or the entire document, that result will be hidden from the list. To view that result again, click on ![]() in the top-right of the window and choose Show Ignored Issues.
in the top-right of the window and choose Show Ignored Issues.
When you’ve set the results window to show ignored issues, they’ll appear greyed out in the list to indicate that you’ve ignored them and they won’t be added to the count in any of the badges — either in the results window or in the toolbar.
To stop ignoring an issue, first make sure you’ve set the results window to show ignored issues, then Control-click on the issue you’ve ignored and choose Stop Ignoring from the contextual menu.
Updating assistants
When developers publish updates to Assistants, you won’t automatically be prompted to upgrade. Instead, you’ll need to install a new version as you’ve done with previous ones. You can have more than one version of the same Assistant installed.
Different documents can use different versions of the same Assistant. To change the version of an Assistant that a document uses, open the Assistants window, click on ![]() and choose Manage Assistants. From there, Control-click on the relevant Assistant and choose a new version from the contextual menu.
and choose Manage Assistants. From there, Control-click on the relevant Assistant and choose a new version from the contextual menu.
Creating Assistants
We’ve created an open platform that lets anyone build an Assistant using JavaScript. So it’s easy for teams to create their own Assistants to help with design systems usage or style guide consistency, as well as for individuals to share best practices with the wider community.
If you’ve built a plugin for Sketch before, you’ll find building an Assistant easy. If you haven’t built a plugin before, you’ll find Assistants even more accessible. Unlike plugins, they don’t require you to create a UI — we’ll handle that for you. All you have to do is write the rules for your Assistant to follow. You could even adopt some of our ready-made rules and configure them to suit your needs.
If you’re interested in building an Assistant — either for your team or for the wider design community — you can dive into our developer docs right now. If you need a little assistance, contact developer@sketch.com and we’ll help you get started.