Exporting
Importing
The easiest way to import files into Sketch is to drag and drop them onto the dock icon or directly onto the Canvas. You can import:
- PNG, JPG, TIFF and WebP bitmap images
- SVG and EPS files
- SVG code (copy the code and paste it in to create a layer)
- PDF documents (each page will be imported as its own artboard)
- AI and PSD files (limited support, only as a flattened layer)
Exporting
The quickest way to export your work from Sketch is to choose Share > Export… from the menu, or press ⌘ + ⇧ + E, to bring up the Export dialog. Select the items you want to export, then click Export to open the MacOS Save dialog.
Sketch exports everything as a PNG at actual size (1x) by default. To change these settings, or export at two or more different sizes or formats, you’ll need to set Export Presets ![]() in the Inspector.
in the Inspector.
You can also select any layer in the Layer List and drag it onto your desktop to export it as a PNG (or hold ⌥ while dragging to export as a PDF. Alternatively, you can select a layer and press ⌘ + E.
Finally, you can export a PDF with all of your Artboards by choosing File > Export Artboards to PDF…. You can choose which order Artboards ![]() export in via Preferences.
export in via Preferences.
How to Create and Use Export Presets
To export a layer within your document in different sizes or formats, select that layer and click on the Make Exportable panel at the bottom of the Inspector. You’ll see the default export preset there, along with a few options to choose from:
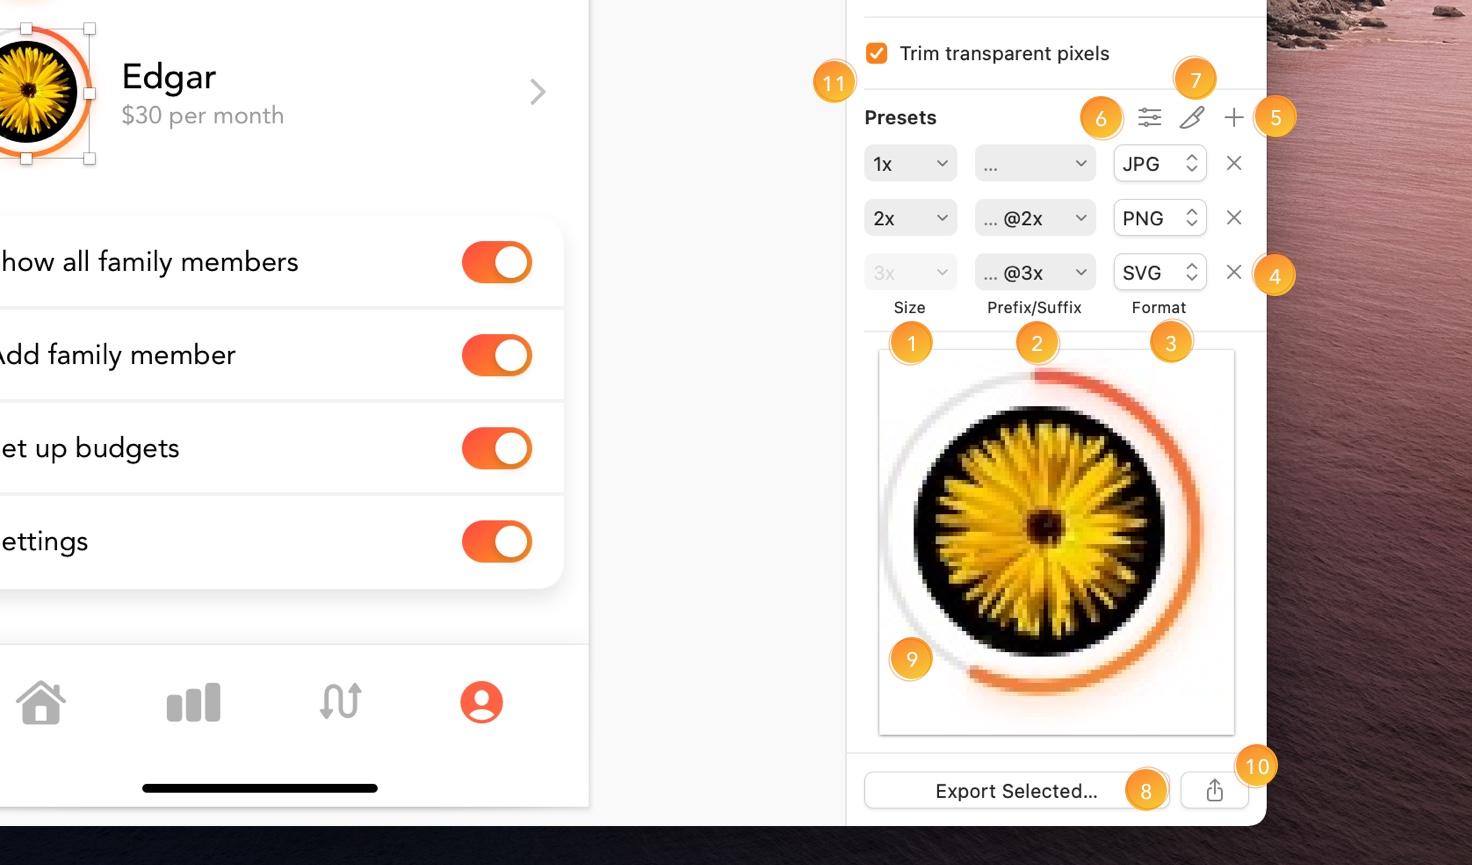
- Size. Select a size from the drop-down menu, or create your own by typing directly into the Size field. You can scale up (2x, 3x, etc.) and down (0.5x, 0.25x) infinitely, or define a specific height or width in pixels (128h or 128w, respectively).
- Prefix/Suffix. If you’re exporting at different scales, you’ll need to use the drop-down menu to select either prefix or suffix. You can customize this by typing in the text field either before (prefix) or after (suffix) the ellipses (…), which represents the file name.
- Format. Pick a format from the drop-down menu. For more information about these, see File Formats.
- Remove Preset. Click the X to remove this export preset.
- Add Preset. Click the + to add another preset for this layer to your export settings.
- Preset Sets
 Click the Presets button to choose a set of pre-defined presets, you can also create new sets of presets and remove them from here.
 - Create a Slice Click on the slice icon
 to create a slice directly on the layer you’ve selected with the export presets you’ve set.
 - Export Selected… Click Export Selected… to export this particular layer using the presets above.
- Preview. The preview shows you how your layer will look when you export it. You can also drag and drop this directly onto your desktop or into another app for a quick export.
- Sharing. Another quick export option is to click the Sharing button for standard options to share via Mail, Messages, AirDrop, etc.
- Trim transparent pixels Enabling this option will remove any transparent pixels that surround content in groups or slices that you export.
How to Use Slices
Slices ![]() are a type of layer you can draw on your canvas that will export anything within them as an image. You can select, resize, move, hide, and group them just like other layers.
are a type of layer you can draw on your canvas that will export anything within them as an image. You can select, resize, move, hide, and group them just like other layers.
How to Insert a Slice
Choose Insert > Slice, or press S, then click and drag anywhere on your canvas to draw a new slice ![]() . Alternatively, click on any layer to create a slice around it.
. Alternatively, click on any layer to create a slice around it.
Tip: When you create a slice, give it a descriptive name in the Layer List as Sketch will use this as the file name for any exports. If you include a / in its name, Sketch will use anything you write before it as a folder name, and anything after as a file name within that folder.
Like other layers, you can set multiple export presets for slices.
How to Customize Slices
Slices have a few special options. These will show in the Inspector when you select a slice ![]() .
.
Checking Trim Transparent Pixels will remove any empty pixels in the slice around the edges of your slice’s content.
If you place a slice within a group, checking Export Group Contents Only will make sure that any slice exports only include content from within that slice’s group.
Checking Background Color and choosing a color will apply it to the background of your slice exports.
How to Export CSS and SVG Code
Select one or more layers in your document, control-click and choose Copy CSS Attributes to copy any style information they have as CSS code to your clipboard. Here’s an example of what a simple shape’s CSS looks like:
/* Rectangle: */
background: #6DD400;
border-radius: 5px;
Copying SVG code works in a similar way. Select a shape layer, control-click on it and choose Copy SVG Code.
Which File Formats can Sketch Export to?
Bitmap
Bitmap images are flattened version of anything you export in Sketch, so they’ll open in other apps as a single layer. Sketch can export to these bitmap formats:
- PNG
- JPG
- TIFF
- WebP
Depending on the file format you choose, you may also see the following options when you export:
- Save for the web: Strips out additional file data from some images, such as EXIF metadata and color profiles.
- Interlace PNG: On the web, interlaced PNGs will load at their full size as soon as possible and download more data after that until they are at full quality.
- Progressive JPG: Similar to interlaced PNG, Progressive JPGs are blurry when they start loading and gradually become sharper.
- Quality: For JPG and WebP images, lower quality images will be smaller in file size.
Vector
Vector image formats preserve layers and paths, so they’re easy to edit and scale infinitely. Sketch supports these vector formats:
- SVG
- EPS
Tip: You can copy and paste SVG code by control-clicking any layer and choosing Copy SVG Code.
Note: Some effects aren’t supported in all file formats, including transparent gradients in PDFs, and inner and outer borders in SVGs.
How to Print Artboards or Slices
Choose File > Print and select the Artboards ![]() you want to print. If you don’t have any Artboards set up, you can print slices instead.
you want to print. If you don’t have any Artboards set up, you can print slices instead.
We’ve also created an official plugin to export Artboards and Pages in a print-ready, CMYK format, with optional bleed and crop marks.