Prototyping
With Prototyping in Sketch, you can preview your designs with animated interactions. To use Sketch’s prototyping features, you’ll need to be using Artboards in your document.
We’ve also included a hands-on guide to Prototyping inside the Prototyping Tutorial. You’ll find it under the Templates tab ![]() in the Documents Window in the Mac app.
in the Documents Window in the Mac app.
Adding Links
The quickest way to create a Prototype is to add a Link between two Artboards ![]() . You can add Links from any layer to any Artboard.
. You can add Links from any layer to any Artboard.
To add a Link, select a layer, choose ![]() next to Prototyping in the Inspector (or press W), then click on an Artboard you’d like to link your layer to.
next to Prototyping in the Inspector (or press W), then click on an Artboard you’d like to link your layer to.
How to Edit Links
In the Inspector, you can choose how a Link’s transition will look using the Animation buttons and change which Artboard a Link takes you to using the Target drop-down menu.
Select “Previous Artboard” in the Target drop-down menu, to tell Sketch to return to whichever Artboard you were previewing before the current one. This is helpful when you have lots of Links leading to a single Artboard.
How to Remove a Link
Choose Prototype > Remove Links from Selection, set your Link’s target to “None” or click the trash icon ![]() in the Prototyping section of the Inspector to remove a Link.
in the Prototyping section of the Inspector to remove a Link.
Adding Hotspots
Hotspots ![]() give you more control than Links and are useful if you want to create a clickable area that’s larger than a single Layer.
give you more control than Links and are useful if you want to create a clickable area that’s larger than a single Layer.
To add a Hotspot ![]() , choose Insert > Hotspot
, choose Insert > Hotspot ![]() (or press H), then click and drag to draw your Hotspot Area. After that, click the Artboard you want your Hotspot to link to.
(or press H), then click and drag to draw your Hotspot Area. After that, click the Artboard you want your Hotspot to link to.
You can edit your Hotspot’s animation and target Artboard, in the Inspector, just like you can with Links.
How to Turn a Link into a Hotspot
Select any Link and click the “Create Hotspot” icon ![]() in the Inspector to turn it into a Hotspot.
in the Inspector to turn it into a Hotspot.
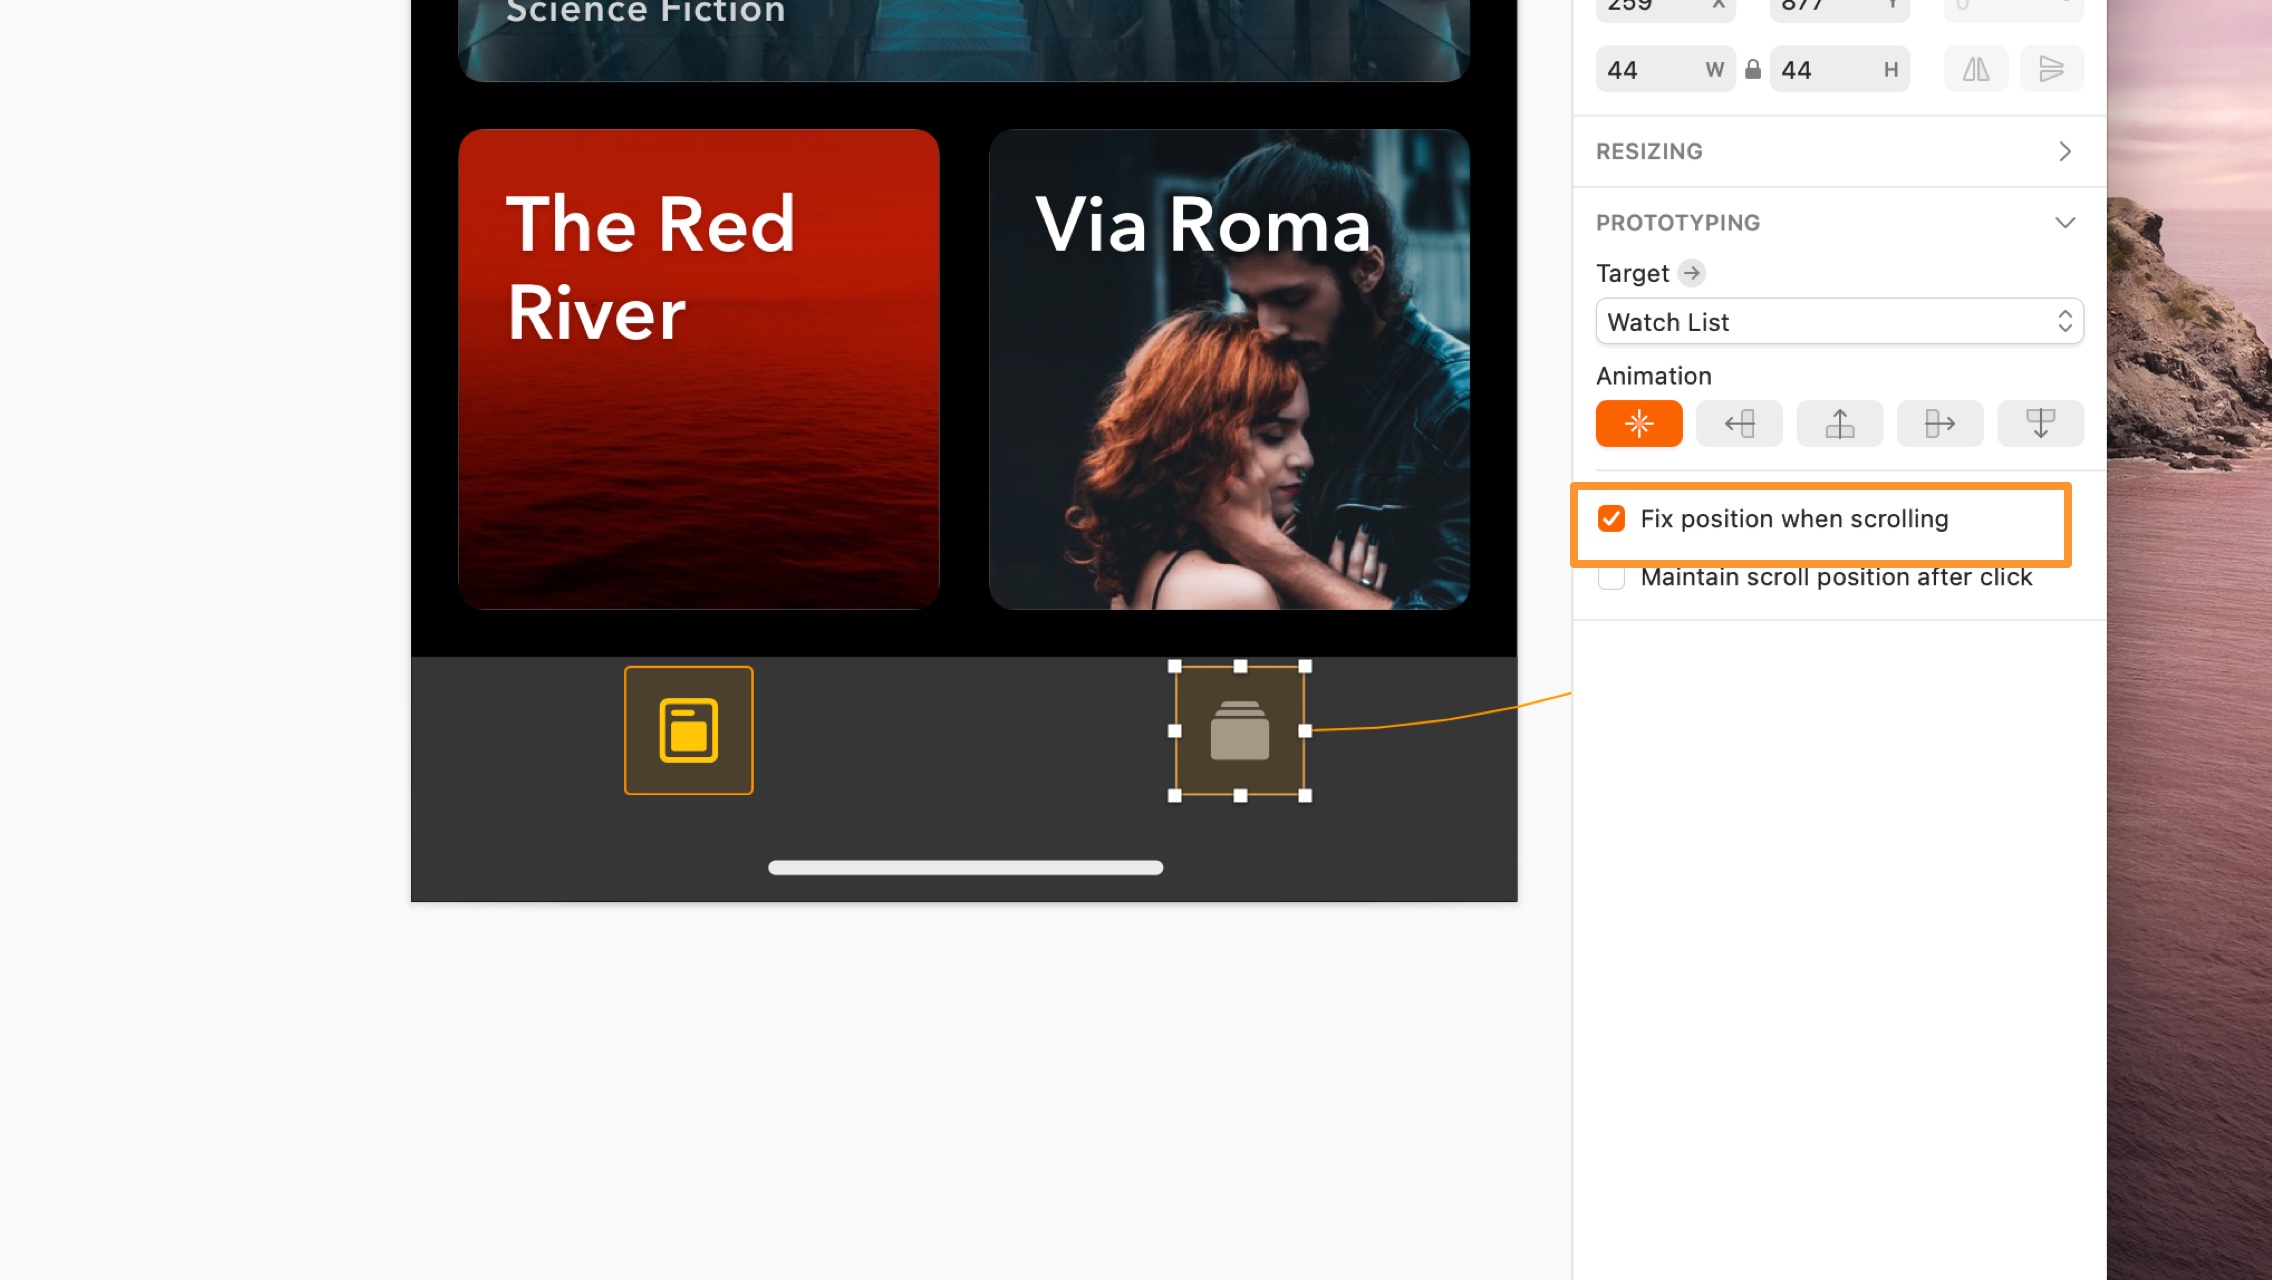
How to Fix the Position of a Hotspot
Select your Hotspot and then choose the Fix position when scrolling checkbox in the Inspector to fix its position on the canvas even as the rest of your Layers scroll.
How to Use Hotspots with Symbols
If you include a Hotspot as part of a Symbol, you can reuse that same Symbol but individually override its Hotspot’s target. You can also override the Hotspot’s target to “None” if you don’t want it to link to another Artboard.
How to Hide Links and Hotspots
Choose View > Show Prototyping ![]() (or press Ctrl + F) to hide the different paths that represent Prototyping Links and Hotspots. You can also change their color under the Canvas section in Preferences.
(or press Ctrl + F) to hide the different paths that represent Prototyping Links and Hotspots. You can also change their color under the Canvas section in Preferences.
Creating Fixed Elements
To create a fixed element, select a layer or Hotspot and check the Fix position when scrolling option in the Prototyping section of the Inspector. Alternatively, choose Prototype › Fix Layer Position when Scrolling in the menu.
This is handy when you want to fix a row of tabs at the bottom of an app design, or have a floating button on a website, for example.
How to Create Scrolling Artboards
If you want to create a prototype with scrolling elements, you’ll need to choose an Artboard preset, or create a Custom Preset, and resize its height. If you don’t use a Preset and draw a custom Artboard instead, your prototype won’t scroll and will appear zoomed out in the app, on Cloud and in Sketch Mirror.
On the left: A resized Artboard that uses the iPhone X preset will scroll within a preview. On the right: A custom Artboard that will shrink down to fit the preview window.
To create a scrolling prototype from an Artboard preset, select your preset and change its height on the canvas. When you do this the preset name in the Inspector changes to include the word “Resized”.
To create a custom size Artboard preset that scrolls, then choose Create Custom Size at the bottom of the Inspector. Confirm your Artboard’s dimensions and name, then change its height on the Canvas. Like regular presets, its name in the Inspector will change to include the word “Resized”.
Using Maintain Scroll Position After Click
When you create a Link from one scrolling Artboard to another, the scrolling Artboard’s position will normally return to the top (the start position) when you play the prototype and click on that Link. This is fine some cases (such as switching between tabs in a mobile app) but not others (like when you want to display a modal or overlay, in place, on top of the scrolling content).
With Maintain scroll position after click switched off, clicking on the link to open the overlay causes the artboard to scroll back to the top, which doesn’t look right.
To make sure a scrolling Artboard stays in position when you click on a prototype Link, select the Link you’re working with and enable the Maintain scroll position after click option in the Inspector.
With this option enabled, when you play your Prototype, scrolling content will stay in the same position as you click on Links and transition between Artboards. This allows you to create overlay-style effects that feel more realistic and don’t interrupt your prototype’s flow.
With Maintain scroll position after click enabled, this overlay appears in place without affecting the scroll position of the content behind it.
Using Start Points
Start Points ![]() let you choose which Artboard your Prototype starts with when you preview it. To set a Start Point, open your Prototype in the Preview window, select an Artboard from the drop-down menu, and click
let you choose which Artboard your Prototype starts with when you preview it. To set a Start Point, open your Prototype in the Preview window, select an Artboard from the drop-down menu, and click ![]() .
.
Whenever you preview your Prototype, you’ll always start with the Artboard you’ve set as your Start Point. To remove a Start Point, select the Artboard in the Preview window and click ![]() again.
again.
Setting Multiple Start Points
You can set more than one Start Point to guide people through different aspects of more complex designs (for example, a sign up flow and a user settings flow). Every time you set a new Start Point, it’ll appear as a different Prototype in the same document in Cloud.
Previewing Prototypes
There are three ways to preview Prototypes — in the Mac app, on your iOS device using Sketch Mirror, or in Cloud where you can share prototypes with others.
How to Preview a Prototype in the Mac App
To start a preview in the Mac app, click the Preview ![]() button in the toolbar. If you’ve set a Start Point, your Prototype will start from there. If not, it’ll start from the currently selected Artboard.
button in the toolbar. If you’ve set a Start Point, your Prototype will start from there. If not, it’ll start from the currently selected Artboard.
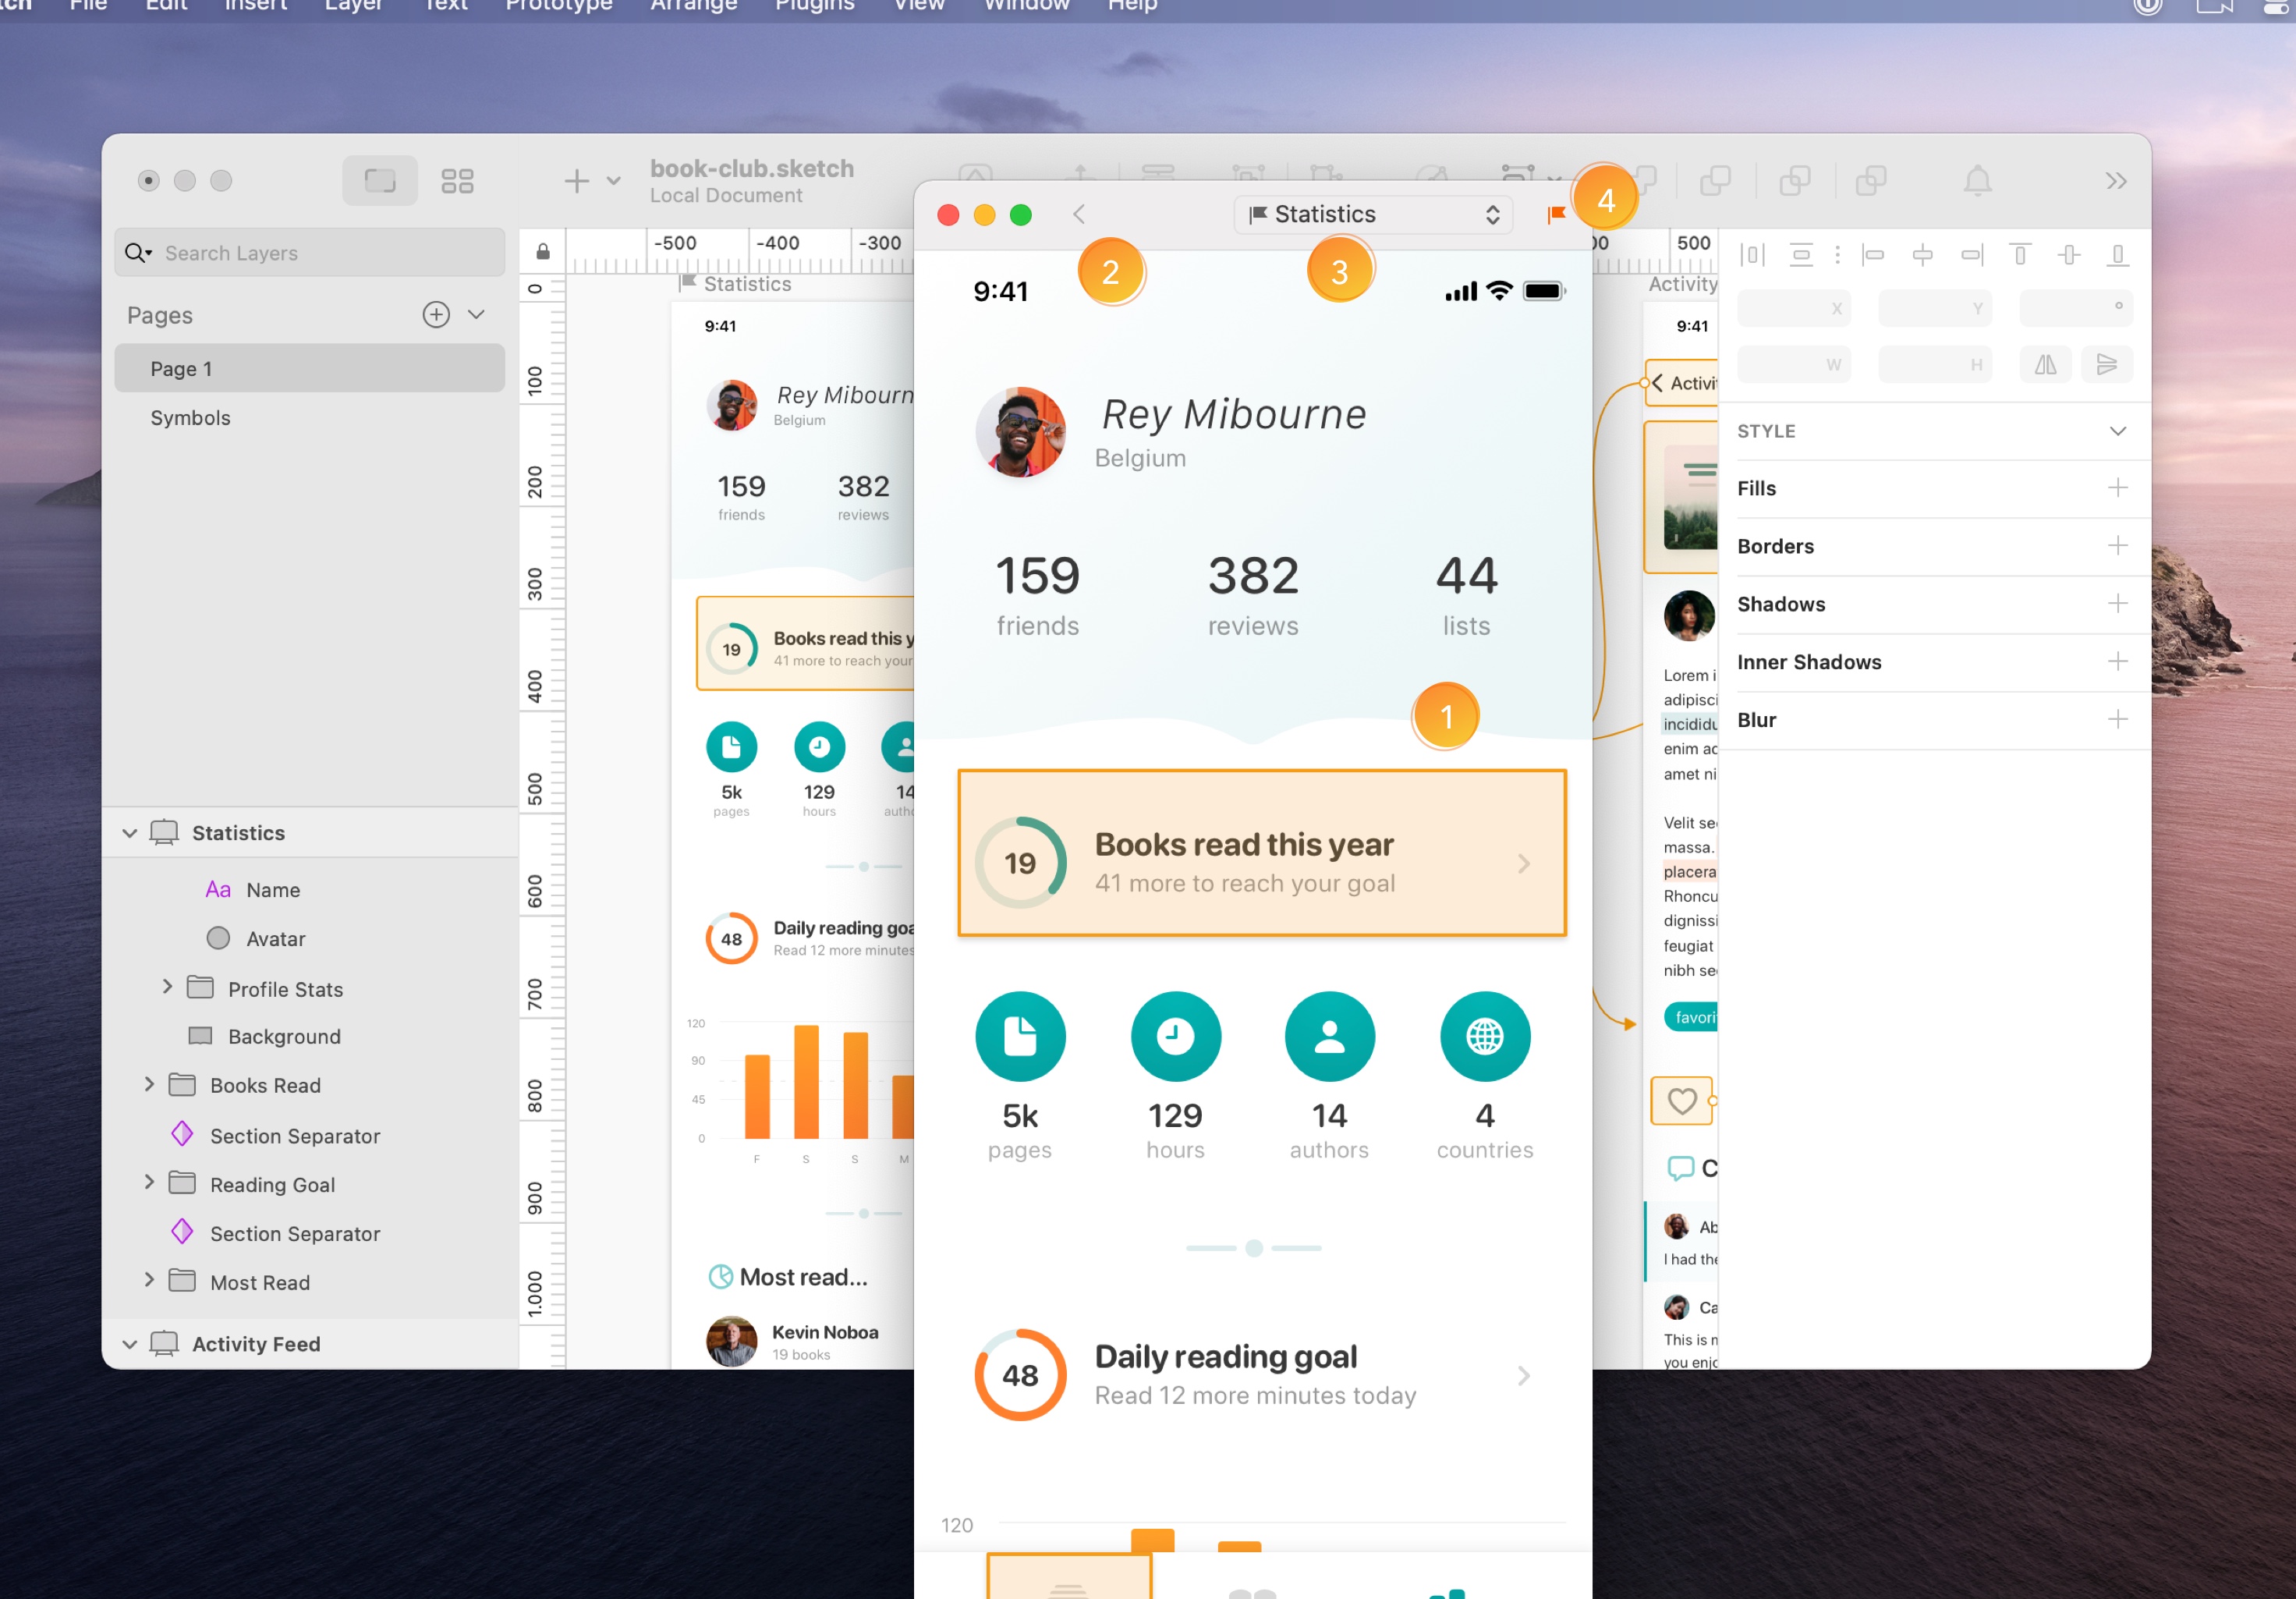
- Click anywhere within the Preview window to see tap targets that show you where Links and Hotspots are on the current Artboard.
- The back button will take you back a step to the previous Artboard in your prototype.
- The Artboards drop-down menu gives you a quick way to jump between different Artboards.
- The flag icon
 sets the Artboard you’re currently viewing as a Start Point.
How to Preview a Prototype in Cloud
When you open a document in Cloud, you’ll see any Prototypes it contains in a section at the top of the document overview. Click on a Prototype’s thumbnail to open and preview it in your browser.
Like the Preview window in the Mac app, clicking anywhere on the screen will highlight any Hotspots or Links. To go back a step to the previous Artboard, click the back button in your browser.
If you’ve enabled comments on your document, anyone viewing your Prototype can choose View Artboard at the bottom of the window to leave the Prototype and enter a static view of that Artboard. From there, they can leave comments in the sidebar. To close the Prototype and return to the document overview, choose Close.
How to Preview a Prototype in Sketch Mirror
Launch the Sketch Mirror app on your iOS device and connect via USB or Wi-Fi, then click the notifications bell ![]() .
.
In Sketch Mirror, tap on an Artboard to start previewing your Prototype. From there, you can tap on Links and Hotspots to navigate your Prototype, or swipe down on an Artboard to close it.