Layer Basics
Layers are the building blocks for creating designs in Sketch. Shapes, Groups and Artboards are all types of layers.
Adding layers
To add a layer, click the Insert ![]() button in the toolbar or the Insert menu item in the menu bar. From there, select the type of layer you want to add.
button in the toolbar or the Insert menu item in the menu bar. From there, select the type of layer you want to add.
Selecting layers
To select a layer on the Canvas, simply click on it. When you do this, you’ll see selection handles appear around that layer.
You can also select a layer in the Layer List by clicking on its name.
Tip: If you can’t see the selection handles, check they’re enabled by heading to View > Canvas > Show Layer Selection.
Selecting multiple layers
To select multiple layers, select your first layer, hold ⇧ and click on another. You can also hold ⇧ and click on a layer you’ve already selected to remove it from the selection.
Alternatively, click-and-drag from an empty area on the Canvas to select any layers within your selection area.
Holding ⌥ while you click-and-drag will only select layers that are completely within your selection area.
Holding ⇧ while you click-and-drag, will add layers to your selection (or remove currently selected layers).
Holding ⌘ while you click-and-drag will remove any currently selected layers from your selection and add any unselected layers within your selection area.
On the left: Shift-drag. On the right: Shift-Option-drag.
You can also select all of the layers within a specific Artboard, by selecting the Artboard itself and choosing Edit > Select > Select All in Artboard from the menu bar.
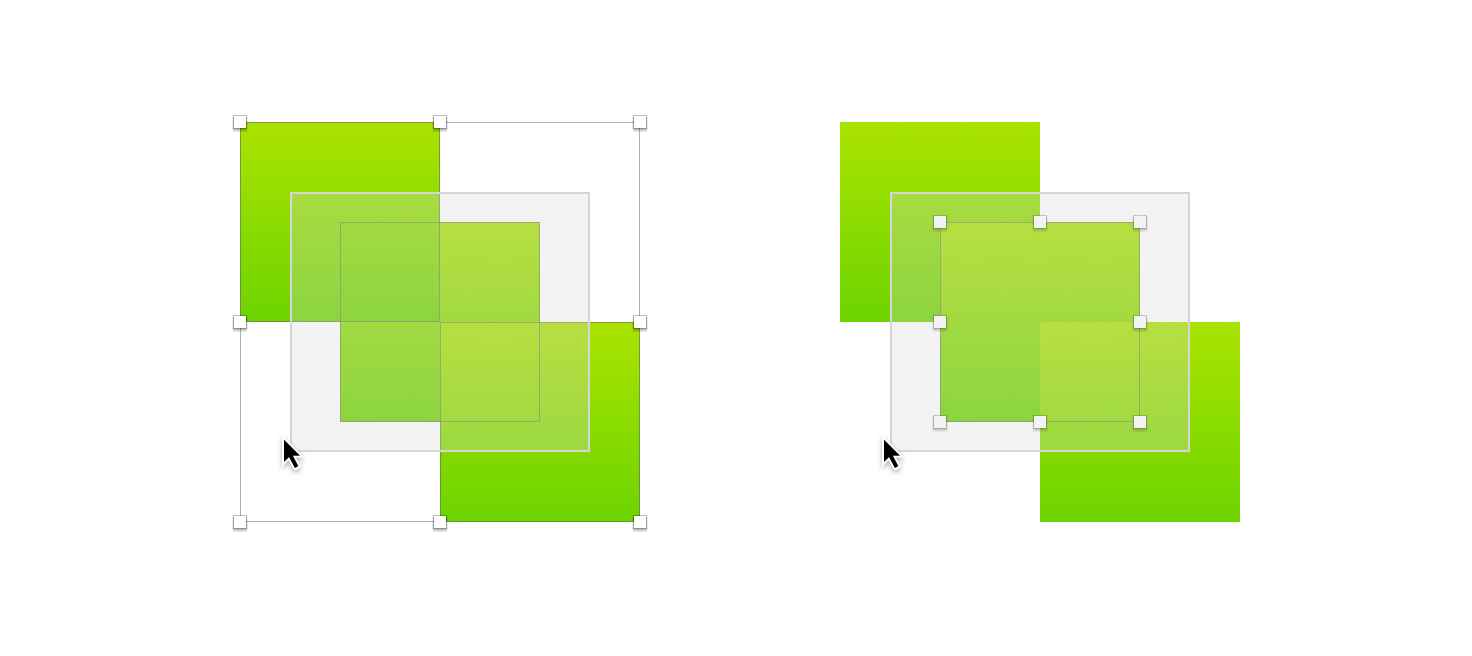
Selecting overlapping layers
You can hold ⌥ to select the second layer underneath your pointer instead of the top one.
If you have more than two layers overlapping, you can Control-click, choose Pick Layer from the shortcut menu and select the layer you want.
Grouping Layers
By grouping multiple layers together, you can do things like move and resize them all at the same time, toggle their visibility together, or adjust their properties like opacity and blend mode ![]() .
.
How to Create a Group of Layers
To create a group, select two or more layers on your Canvas and press ⌘ + G. You can also choose Arrange > Group ![]() .
.
How to Ungroup Layers
Select the group you’d like to ungroup and press ⌘ + ⇧ + G. You can also choose Arrange > Ungroup ![]() .
.
Selecting a Layer in a Group
Groups of layers ![]() are treated as one when you select them. To select an individual layer in a group, double-click on the group, then click on the layer you want to select.
are treated as one when you select them. To select an individual layer in a group, double-click on the group, then click on the layer you want to select.
You can also hold down ⌘ and click on the layer within the group you want to select.
To disable this across your whole document and automatically select a layer within a group without double-clicking first, check the Enable click-through for new groups checkbox under the layers tab in Sketch’s Preferences.
You can also enable this for individual groups by selecting a group checking the Select group’s content on click option in the Inspector.
Moving layers
To move a layer, simply click and drag it. If you want to restrict movement to a particular axis, hold ⇧ as you drag.
To move a layer that’s underneath another layer, make sure you’ve selected it, hold ⌘+⌥, and then click and drag anywhere on the Canvas.
Tip: Sketch automatically aligns the layer(s) you’re moving to adjacent ones. If this doesn’t happen, check that guides are enabled in View > Canvas > Show All Guides
Rotating layers
To rotate a layer hold ⌘ and click on any of the corner selection handles to rotate it in the direction you want.
How to distribute and arrange multiple layers with Tidy
You can quickly distribute and align multiple layers into a neat grid, with distributed spaced rows and columns, with the Tidy button. To do this, select the layers you want to tidy and click on the Tidy button at the top of the Inspector. Your grid will fill the space of your selection and Sketch will attempt to arrange layers evenly in rows and columns.
Make Grid
Select a layer and head to Arrange > Make Grid in the menu. Drag the handle in the bottom-right corner to edit the number of columns and rows in your Grid. Use the handles to edit the spacing between layers. You can also use the controls in the Inspector to edit the number of cells and spacing in your Grid.
You can make grids out of several layers. Make sure your layers are evenly distributed, select them and drag the bottom-right handle to make your Grid.
Note: Sketch will use the last layer of your selection to create the Grid.
Moving Multiple Layers with Smart Distribute
With Smart Distribute you can quickly adjust even spacing between multiple layers, horizontally ![]() or vertically
or vertically ![]() . To do this, select two or more layers, then click and drag on the handle that appears between them. If you have layers arranged in a grid, you can adjust the spacing between each layer in a horizontal row, as well as the vertical spacing between rows themselves.
. To do this, select two or more layers, then click and drag on the handle that appears between them. If you have layers arranged in a grid, you can adjust the spacing between each layer in a horizontal row, as well as the vertical spacing between rows themselves.
Smart Distribute won’t appear if your layers aren’t evenly distributed. To fix this, you can either evenly distribute your layers manually or use the Tidy button.
For very small selections, or when you’re zoomed far out from your selection, Smart Distribute handles hide to make the layers themselves easier to see. If can’t see a set of Smart Distribute layers for your selection, you may need to zoom in.
Note: From version 67, Smart Distribute and Tidy work with selections of layers that are inside and outside of different groups.
Swapping Layers within a Smart Distribute selection
When you’ve selected a set of layers with even spacing between them, you can click and drag on the circular handle that appears in the centre of any layer to move it within that selection. The layers around it will automatically swap positions with the one you move.
This also works for entire Artboards, making it handy for rearranging entire flows on the Canvas.
Swapping Layers in Grid-like Layouts
You can swap layers in your grid layouts without changing the number of rows or columns in your grid. Select all the layers in your grid, then drag on the circular handle that appears in the centre of any layer to swap it with another.
Duplicating layers
Select a layer and press ⌘ + D to create a duplicate on top of the original, in exactly the same position. Or hold down ⌥ as you drag a layer to create a duplicate. It’ll keep the original in its place.
Tip: If you hold ⌥ and drag to duplicate a layer, then immediately press ⌘+D after, Sketch will create a third layer at exactly the same offset as your duplicate.
Aligning layers
You can align layers using the six alignment buttons in the top row of the Inspector.

Left to right: Distribute horizontally, distribute vertically, align left, align horizontally, align right, align top, align vertically, align bottom.
If you have a MacBook Pro with a touch bar, you’ll also see these options when you select a group of layers.

Sketch will align a layer you select to its Artboard (if you’re using them).
If you select two or more layers, Sketch will align everything to the largest layer. To override this and align objects to a specific layer, select that layer and lock it (⌘+⇧+L), hold ⇧ to keep your locked layer selected, and then select the objects you want to align.
To align a selection of two or more layers to an Artboard, select your layers, hold down ⌥ and click the alignment button you want to use.
Distributing layers
You can distribute layers vertically and horizontally using the dedicated buttons along the top row of the Inspector. Or you can also use Ctrl+⌘+V or Ctrl+⌘+H, respectively.
Alternatively, you can distribute layers with fixed spacing using the Create Grid tool ![]() .
.
Each of these methods take pixel fitting into account.
Resizing layers
To resize a layer, select it, then click and drag on any of its selection handles. Handles on the sides of the layer will adjust the height or width, while handles on the corners will adjust the height and width together.
Holding ⇧ will resize the layer proportionately, keeping its height and width at the same ratio.
Holding ⌥ will resize the layer from its center, rather than the edge you’re dragging from.
Resizing layers in the Inspector
You can also resize a layer by selecting it and typing its dimensions in the Inspector.
By default, this will resize layers from their top-left corners, but you can change this using the following keyboard shortcuts:
| l | Scale from the left (default) |
| r | Scale from the right |
| t | Scale from the top (default) |
| b | Scale from the bottom |
| c / m | Scale from the center/middle |
The Inspector also lets you use math to resize or move layers with the following:
| + | Add (e.g. 50+10) |
| - | Subtract (e.g. 45-5) |
| \* | Multiply (e.g. 128*2) |
| / | Divide (e.g. 960/2) |
You can also use percentages to change the height or width of layers relative to its group or Artboard. For example, setting a layer’s height to 10% in a 960 pixel-wide Artboard will change its width to 96px.
Finally, if you’re editing the corner radius of a rounded rectangle, you can use ; to specify a different value for each corner (e.g. 30;40;20;30).
Tip: If the lock icon is closed ![]() , the layer will resize proportionately.
, the layer will resize proportionately.
Resizing layers with keyboard shortcuts
For precise adjustments, you can select layers and resize them using the following keyboard shortcuts:
| ⌘ + → | Increase width by 1px |
| ⌘ + ← | Decrease width by 1px |
| ⌘ + ⇧ + → | Increase width by 10px |
| ⌘ + ⇧ + ← | Decrease width by 10px |
Scaling layers
Any styles you’ve applied (such as a strokes, border radius or shadow sizes) will stay the same when you resize a layer. To have them scale proportionately with your layer size, head to Layer > Transform > Scale… or press ⌘ + K.
In the Scale controls in the Inspector, you can choose whether your layer will resize from its center, sides or corners. You can see a preview of all your changes as you go in the Canvas.
Resizing constraints
The resizing constraints in the Inspector let you choose how layers behave when you resize the Artboard, group or symbol they’re a part of.
Tip: By default, Sketch will resize layers within a Group or Symbol relative to their parent, including any padding.
If you want a layer to resize relative to the Artboard it’s a part of, select the Artboard itself and check Adjust content on resize in the Inspector.
To set resizing constraints, select a layer within an Artboard, Group or Symbol to show the resizing constraints controls in the Inspector.
The controls on the right let you set which edges of a parent your layer will pin to, while the controls in the middle let you set whether your layer’s height and width should stretch or stay at a fixed size. On the right, there’s a preview to show how the controls you select affect your layer’s behavior.
Fix Size
The Fix Size constraints keep a layer’s height or width (or overall dimensions) the same, no matter how its parent is resized.
This is useful, for example, if you have a menu bar in an interface that you want to keep the same height, no matter how tall the Artboard it’s in becomes.
In this example, the menu symbol height is fixed and its width is not. It will resize horizontally for larger device sizes, but not stretch vertically.
Pin to Edge
Pin to Edge fixes the distance between a layer and a particular set of edges or corners of its parent, no matter how the parent is resized.
This is useful, for example, if you have a floating action button within an interface, pinning this to the top and left edges will make sure it stays the same distance from the corner of an Artboard.
In this example, the button has a fixed height and width and is pinned to the top-left edge. It wont resize resize and its position will stay fixed when its parent container resizes.